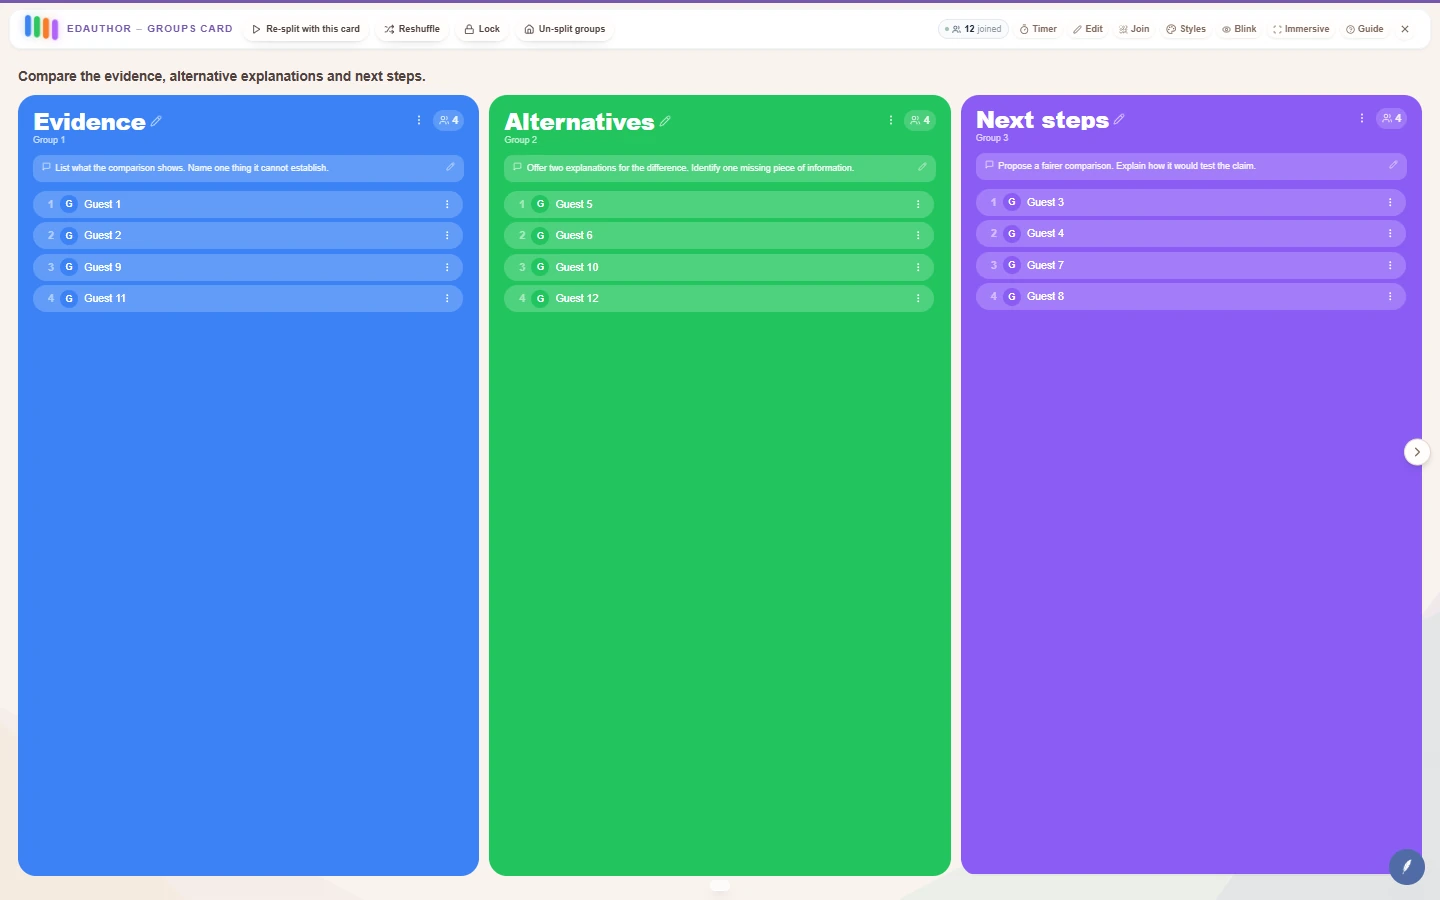
What the Groups card does
A Groups card stores a plan for organising participants: the split method, number of groups, labels, colours and a separate instruction for each group. Put it in a card set at the point where the class should begin working together.
Opening the card does not assign anyone. The host starts the grouping from the live controls when participants are ready. This gives you time to explain the task and let everyone join.
The card creates the live session’s actual groups. They remain in place when you move to another Activity Card; they are not a temporary preview or a separate set of teams used only on this slide. Returning to the card shows the current groups without automatically splitting them again.
The reusable card stores your plan, not a class list. When you use it in a new session, it works with the participants in that session.
Choose the right split method
The Groups card offers four methods. Choose the one that fits how you want the activity to begin.
| Method | What happens when you start | Use it when | Keep in mind |
|---|---|---|---|
| Balanced | Participants are shuffled, then distributed as evenly as possible across the prepared groups | You want similar-sized discussion groups | Balance refers to numbers, not ability, experience or subject knowledge |
| Random | Each participant is assigned randomly to a prepared group | Unequal group sizes are acceptable | Some groups may be larger, smaller or empty |
| Self-select | Participants choose from the groups you have prepared | Learners should choose a topic, role or perspective | Choices do not automatically produce equal group sizes |
| Self-create | Participants enter group names; matching names join the same group | Learners already know their team or are forming their own groups | Group names are supplied during the session, so the prepared count and per-group settings are hidden |
With Balanced, Random or Self-select, prepare 2–20 groups. The editor has buttons for 2–6; use the 7+ number field for a larger count and press Enter or leave the field to apply it. This is the number of groups, not the number of people in each group.
For a first run, use three Balanced groups with a clear task for each. With twelve participants, that produces four people in each group. With thirteen, one group will have an extra person. Avoid preparing more groups than you have people unless empty groups serve a purpose.
Build the Evidence clinic example
The example uses one claim and three perspectives. Share this fictional scenario before splitting:
Students who attended an optional revision workshop achieved higher average marks than students who did not. Students chose whether to attend. The report does not compare their earlier marks, study time or motivation.
The task is to distinguish an observed difference from evidence that the workshop caused it. Each group examines a different part of the reasoning, then the class combines the findings.
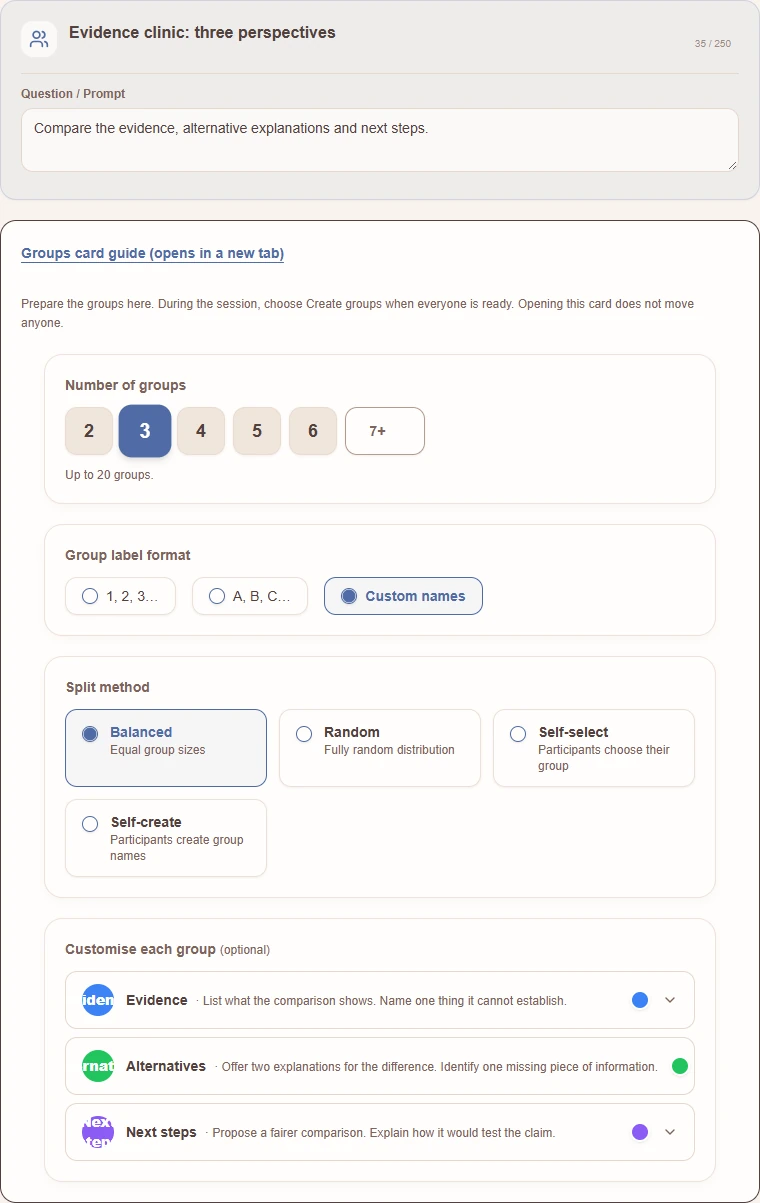
- Open a card set and choose Add activity, then Groups.
- Give the card the title Evidence clinic: three perspectives.
- In Question / Prompt, enter Compare the evidence, alternative explanations and next steps.
- Set Number of groups to 3.
- Choose Custom names under Group label format.
- Choose Balanced under Split method.
- Open each row under Customise each group and add the names, colours and instructions below.
- Save the card set. Check the host preview before presenting it.
You can download the short Evidence clinic brief and share it through a Utility card. Participants should have the common evidence before they begin their different tasks.
Give each group a useful instruction
Under Customise each group, open a group row. With Custom names selected, use Group name for a short, recognisable label. Choose a Group colour, then write the task in Instruction / message for this group.
| Group | Suggested colour | Instruction |
|---|---|---|
| Evidence | Blue | List what the comparison shows. Name one thing it cannot establish. |
| Alternatives | Green | Offer two explanations for the difference. Identify one missing piece of information. |
| Next steps | Purple | Propose a fairer comparison. Explain how it would test the claim. |
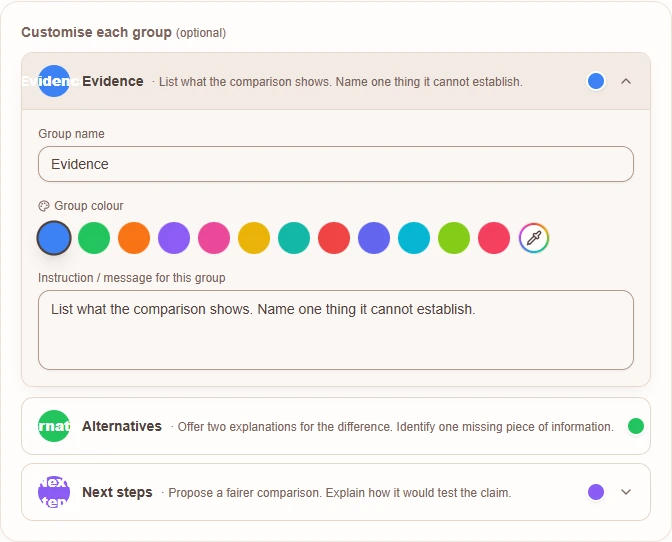
The shared prompt introduces the overall activity on the host slide. The group instruction tells members what their own group needs to do and appears in their participant group view.
Keep instructions concrete. “Discuss the evidence” is less useful than “List what the comparison shows and one thing it cannot establish.” State the expected output, then explain the time limit and reporting format aloud or in the supporting material.
Set the number of groups before writing detailed instructions. Reducing the count removes the extra prepared group rows, so check their contents before doing so. Use numbered or lettered labels when custom names add little value.
Start the groups during a live session
Present the card when the class reaches the group activity. Before any groups have been created, the host sees the prepared names and instructions. Participants remain in the normal session view while you introduce the task.
Check that everyone who should take part has joined, then use the button for the chosen method:
- Balanced or Random: choose Create groups.
- Self-select: choose Open group selection.
- Self-create: choose Let participants create groups.
After the setup completes, the host sees live group panels containing the actual members. Check the names and group sizes before starting the discussion.
If the session already has groups, the card shows those current groups. To replace them with this card’s prepared setup, choose Re-split with this card, read the confirmation and select Replace groups. This starts a new group round. Existing Activity Card responses are kept.
Do not repeatedly re-split simply because a participant’s screen has not updated yet. First check their connection and the current host membership list. If a setup is interrupted, follow the recovery guidance below.
What participants see
After a Balanced or Random split, participants go straight to their normal group screen. They see their group label, colour and instruction; there is no extra Groups activity to answer or submit.
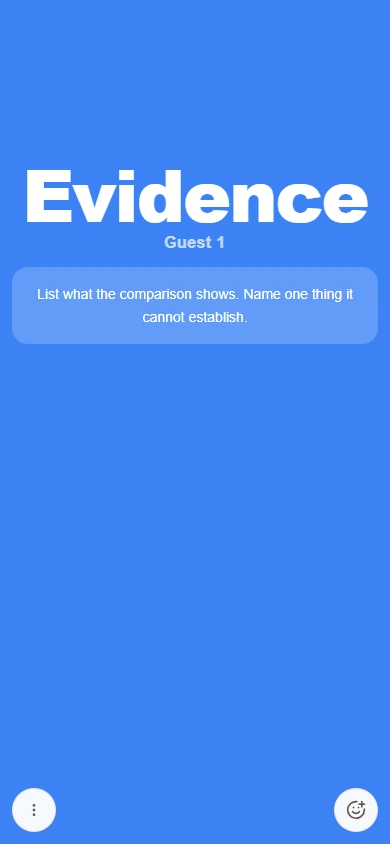
Tell the class how to work together: move to a table, discuss with the named members, or use the permitted group chat. The Groups card organises membership and instructions; it does not create a video meeting or a shared answer automatically.
When you advance to the next Activity Card, participants can continue working with their group while responding to that activity. Explain whether everyone should submit their own response or whether you want a spokesperson to report verbally.
Run Self-select and Self-create
Self-select: choose a prepared group
Prepare the count, names and instructions as usual, but select Self-select in the editor. In the live session, choose Open group selection.
Unassigned participants see Choose your group and tap the group they want to join. This is useful for topic stations or choosing which perspective to investigate.
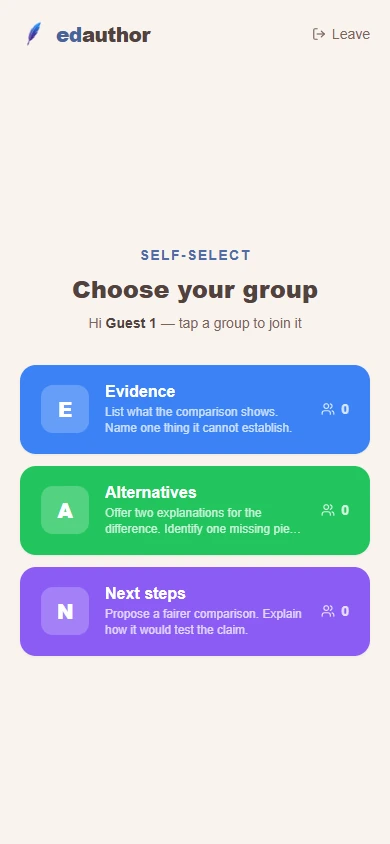
For the Evidence clinic, ask participants to choose the perspective they most want to explore. If too many choose one topic, agree a redistribution with the class or move people as the host. Self-select is not a guarantee of equal numbers.
Self-create: join by a shared name
Choose Self-create. The group-count, label-format and per-group customisation sections are hidden because participants will supply the group names.
Select Let participants create groups in the live session. Participants enter their agreed name to create or join a group. Matching ignores capitalisation and spaces at the beginning or end: Evidence Team and evidence team match. Different spelling or spacing inside the name can create a separate group, so agree the exact wording first.
New groups appear on the host screen as participants join. Review the names and membership, add instructions if needed, and lock the structure when everyone is settled. Self-create names can contain up to 50 characters.
Joining a group and later switching groups are different actions. Whether members can move freely afterwards depends on the live session permissions and whether groups are locked.
Manage groups while people work
Use the Groups card’s live toolbar for the main grouping actions. The normal session group panels provide membership and detail controls.
| Control | Effect | Before using it |
|---|---|---|
| Lock | Freezes the group structure and prevents ordinary membership changes | Confirm that members are in the right groups |
| Unlock | Allows group changes again | Tell participants if switching is permitted |
| Reshuffle | Replaces the current participant assignments with a fresh split | Read and confirm the change; it is not a refresh button |
| Re-split with this card | Applies this card’s prepared setup as a new group round | Review the existing groups before choosing Replace groups |
| Un-split groups | Removes the groups and returns everyone to individual participation | Confirm the action; the current activity stays open |
Lock protects the grouping, not the discussion. Participants can still answer activities and use communication features that the session permits. Unlock before renaming groups, changing their structure or moving already assigned members.
In an unlocked group panel, open Group options to rename it, change its colour or edit its details. Use a participant’s menu to move them to another group or set a group leader. These are changes to the live session; edit the saved Groups card separately if you want the revised plan in future classes.
A group leader is a visible role. Assigning one does not automatically turn every member’s activity response into a single team submission.
Set permissions and handle late arrivals
Review Group permissions in the live session:
- Group Chat controls whether participants can use their group chat.
- Allow group switching controls free movement between groups while the structure is unlocked.
- Allow group name changes and Allow group detail changes control whether members can edit their group’s information.
- Show group sizes and Show other groups control what participants can see about groups.
Choose these settings to match the task. For a short assigned-perspective discussion, check membership and lock groups. For topic exploration, you might allow switching until the discussion starts.
A late arrival may see Waiting for a group and The presenter will assign you to a group shortly. Check the participant list and assign the unassigned person to an existing group. The host can place an unassigned late arrival without unlocking everyone else’s established membership.
If you want to move someone who is already assigned, unlock first. Avoid using Re-split simply to accommodate one late arrival, because it replaces the broader arrangement.
Connect the groups to other Activity Cards
The Groups card is the organising step. Follow it with activities that make the discussion visible.
For the Evidence clinic:
- Share the brief and form the three groups.
- Allow a few minutes for the separate tasks. Use a Utility Timer if you want a visible countdown.
- Invite one short contribution from each group.
- Ask everyone to submit one proposed improvement to the study in a Thought Bubble.
- Follow with a Multiple Choice question about what the original comparison can establish.
- Ask participants to explain how their group discussion changed their answer.
On supported response cards, choose Segment by group from the response filter to compare groups. The presentation depends on the card: Multiple Choice can show group segments within its results, while other supported cards can display separate group panels.
Grouping does not automatically make an activity scored or change it to one response per team. Keep the response instructions explicit, and use the scoring and response controls of the Activity Card you are running.
Existing responses are not deleted by re-splitting. When comparing rounds, explain which task and group arrangement the responses came from rather than assuming that the groups stayed identical.
Preview and rehearse before class
In the editor, check the Host preview to see the prepared group names, colours and instructions. Use the card’s Styles controls to make the slide readable; the supported panel appearance settings can also change how the group panels sit over the background.
If you edit a visible group name or instruction directly in the editor’s preview, check that the matching Contents field reflects the change. The preview remains an authoring view: it does not create groups in a live session.
The participant experience is best checked in a short live rehearsal, because it depends on real membership and session permissions. A static preview cannot show who will join which group.
Use fictional participants or a test session to check:
- Opening the card leaves everyone where they are until the host starts the split.
- Balanced assigns the expected number of people to each group.
- Every participant can identify their group and read the correct instruction.
- Self-select or Self-create works if you plan to use it.
- Lock prevents unintended changes and Unlock restores the relevant controls.
- A follow-up Activity Card works while groups remain active.
- Un-split returns participants to individual participation without closing the current activity.
Check the host display at presentation size and a participant device at phone size. Short names and concise instructions are easier to scan than a long paragraph inside every group panel.
Reuse and adapt the plan
Save the Groups card in the card set alongside the activities it supports. Reusing the set brings back the prepared method, group definitions and instructions; it does not import the people from a previous class.
For a second group round, prepare another Groups card with the new tasks. Present it, explain the change, then deliberately apply its setup. Merely navigating to it does not reorganise the room.
Other useful patterns include:
- Case perspectives: one group analyses evidence, one stakeholders and one possible consequences.
- Design review: groups focus on usability, feasibility and evidence for the proposed benefit.
- Topic choice: use Self-select for several readings or problems, then bring the different findings into a shared response activity.
- Existing project teams: use Self-create with agreed names, then check the membership before locking.
For a jigsaw-style activity, plan both rounds and explain the required mix. Balanced and Random do not guarantee that each new group contains someone from every previous group; use deliberate host adjustments if that composition matters.
When a grouping does not look right
Opening the card does nothing to membership. This is expected. Use Create groups, Open group selection or Let participants create groups when the class is ready.
The live card shows old groups instead of the prepared ones. Groups already exist in the session. Review them, then use Re-split with this card if you intend to replace them.
Groups are unequal or empty. Random and participant choice can produce this result. Choose Balanced for similar numbers, or adjust membership. Check that you have not prepared more groups than participants.
Controls are disabled. Groups may be locked, you may be in a static preview, or the card may no longer be active. Return to the live card and unlock only if a group change is intended.
Only some assignments were saved. Check the connection, read the error and use Finish group setup if offered. This completes the interrupted setup rather than intentionally starting a different split. Recheck membership before continuing.
A participant is waiting for a group. Check that they joined the correct session. Assign them as the host, or confirm that the chosen self-selection method is still open.
Self-create produced two similar groups. Check the exact spelling and spaces inside the names. Agree one name, then correct the live membership.
The group instruction is missing or outdated. Check the saved card’s Instruction / message field and the current live group details. Changes to a live group and changes to a reusable card are separate.
Participants cannot switch groups. Check Allow group switching and the lock state. Choosing Self-select initially does not override a later lock.
You need to return to whole-class work. Use Un-split groups and confirm it. If you simply want to show another Activity Card while keeping the groups, advance to that card instead.