What the Utility card does
A Utility card holds the practical tools for a session in one place. A participant can read a shared brief, check the timer, submit a vote and write a reflection without the host moving through several Activity Cards.
Choose the tools you need. A simple reading activity might use just Timer and Share Files. A discussion workshop can also include Voting, Order and edauthor forms.
| Tool | Prepare in the editor | Host action during the session | Participant experience |
|---|---|---|---|
| Timer | Duration, caption and participant sound setting | Start, pause, resume or reset the countdown | Watch the same countdown |
| Share Files | One file and a message | Display the prepared resource | Preview it or open/download the original |
| Voting | Question, vote type and options | Open voting, publish results or prepare a new round | Submit one vote per round |
| Order | Join-time order or a random order | Show or update the order | See their position |
| edauthor forms | Questions, field types and required answers | Open or close the form; review submissions | Complete and submit the form |
The host and participant do not have to view the same tab. The host can show a timer on the big screen while participants read the file or finish an open form. Selecting a tab does not start that tool, close another tool or reset its work.
Utility supports facilitation and information gathering. Its votes and forms do not award correct-answer points. For assessed answers, use a Multiple Choice card, Quiz or Scratch Card.
Build the Evidence clinic example
This walkthrough creates a short workshop about evaluating a claim. The brief describes a fictional comparison between students who attended an optional revision workshop and those who did not. Participants consider alternative explanations, vote on a useful next step and explain their reasoning.
- Open a card set and choose Add activity, then Utility.
- Give the card the title Evidence clinic.
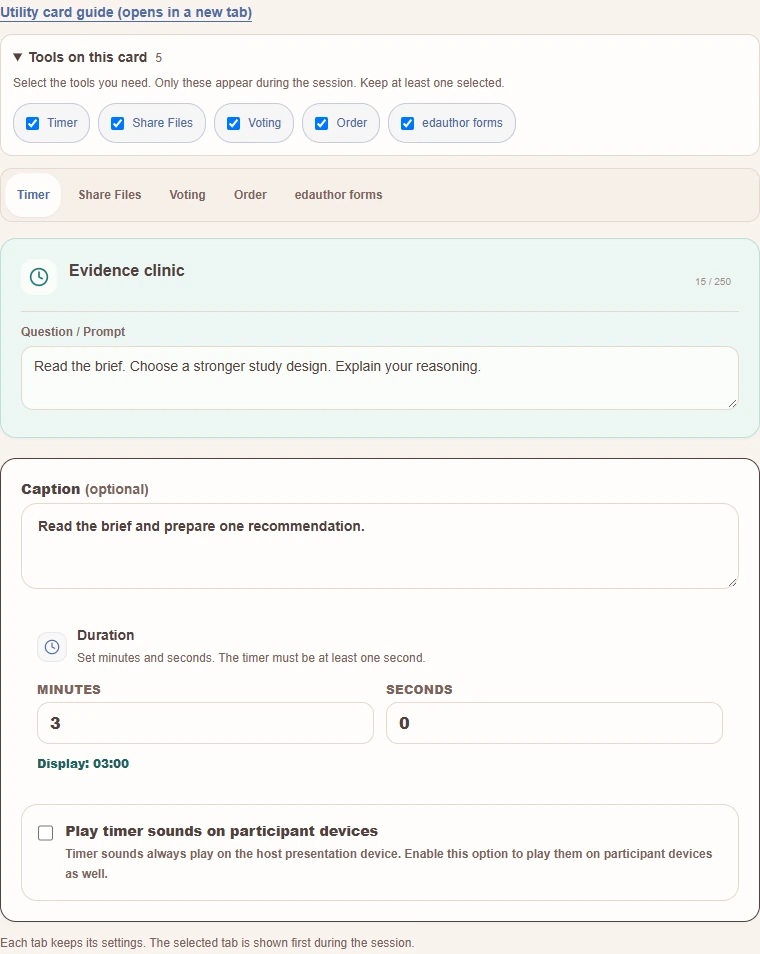
- Open Tools on this card. Select Timer, Share Files, Voting, Order and edauthor forms. Keep at least one tool selected.
- In Question / Prompt, enter Read the brief. Choose a stronger study design. Explain your reasoning. This is the shared prompt for the card.
- Work through the tabs to prepare each tool using the instructions below. Each tab keeps its settings.
- Select Timer again before saving if you want it to be the first tool displayed. The selected editor tab determines the initial tool; participants can then choose among the included tabs.
The examples below are ready to adapt. Replace the brief and questions with a source from your own discipline while keeping the same workshop sequence.
Set up and run the Timer
In the Timer tab, enter 3 under Minutes and 0 under Seconds. Add the caption Read the brief and prepare one recommendation.
The Play timer sounds on participant devices setting controls whether the countdown's sounds are sent to participant devices. Host presentation sounds are available separately. Begin with participant sounds off if several devices will be close together.
During the live session, select Start when everyone has the brief. Pause holds the countdown; Resume continues it. Reset returns it to its full duration, ready to start again. Signal participants provides a separate attention signal. The live controls also let you change the participant sound setting.
A running timer continues when you switch to another included tool. It does not automatically close a vote, submit forms or move the class to the next Activity Card. Tell participants what you want them to do when time is up.
Under Styles, the timer can use a Digital Timer or an Analogue Clock display. Both show the same countdown. Check the style at the size you will actually present.
Sound check: browser audio may need a tap or click before it can play. Check device volume, silent settings and the participant sound control in a short rehearsal. A static editor preview is not a reliable sound test.
Share a brief or resource
Select Share Files. Add a short Message for participants, such as Read the brief, then compare your explanations.
Use Upload new, drop a file into the upload area, or choose an existing item from File library. One file is attached to this card at a time. Replace file changes it; Remove file clears the attachment from the card.
For the example, download the Evidence clinic workshop brief, then upload that small text file. You can also prepare your own accessible PDF or image.
- Files must be 3 MB or smaller, including items chosen from the library.
- PowerPoint files cannot be attached directly here. Export the slides as a PDF first; the editor includes help for doing this.
- PDFs and supported documents have an in-card preview. Images, text, audio and video use the appropriate viewer where supported.
- Open / Download gives access to the original attachment. Use it if a file cannot be previewed, or if a participant needs a different application.
- A long text preview may be shortened. Open the original for the complete file.
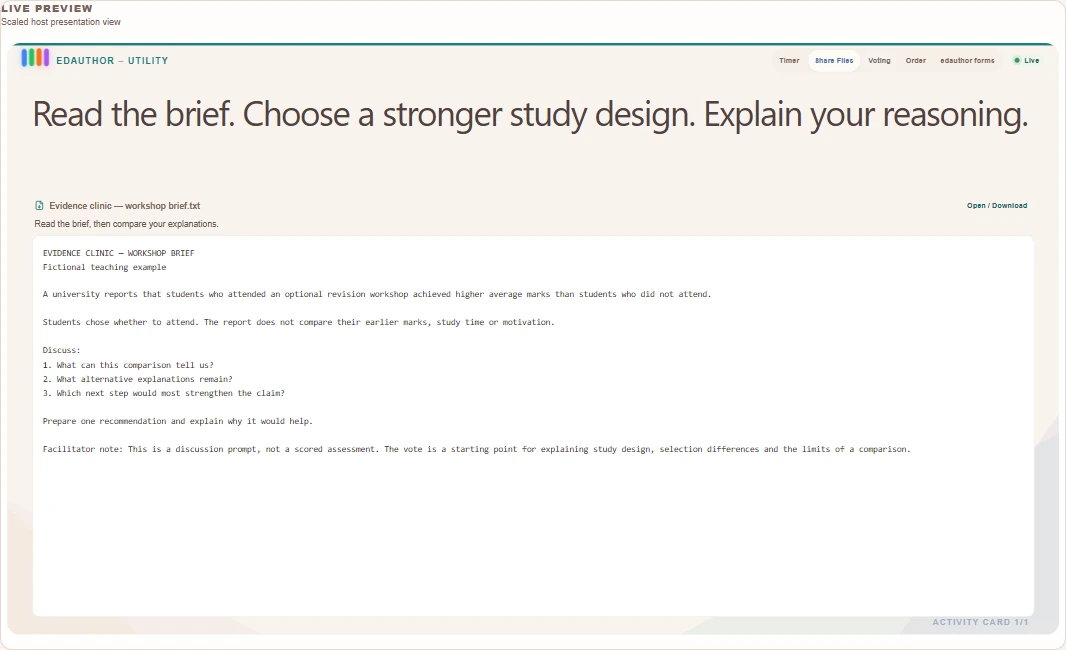
Share Files distributes a resource; it does not mark a participant as having understood or completed it. Use a follow-up question or form to collect that evidence. If EdAuthor shows a plan-access prompt, the account needs access to file sharing before this tool can be used.
Prepare and conduct a vote
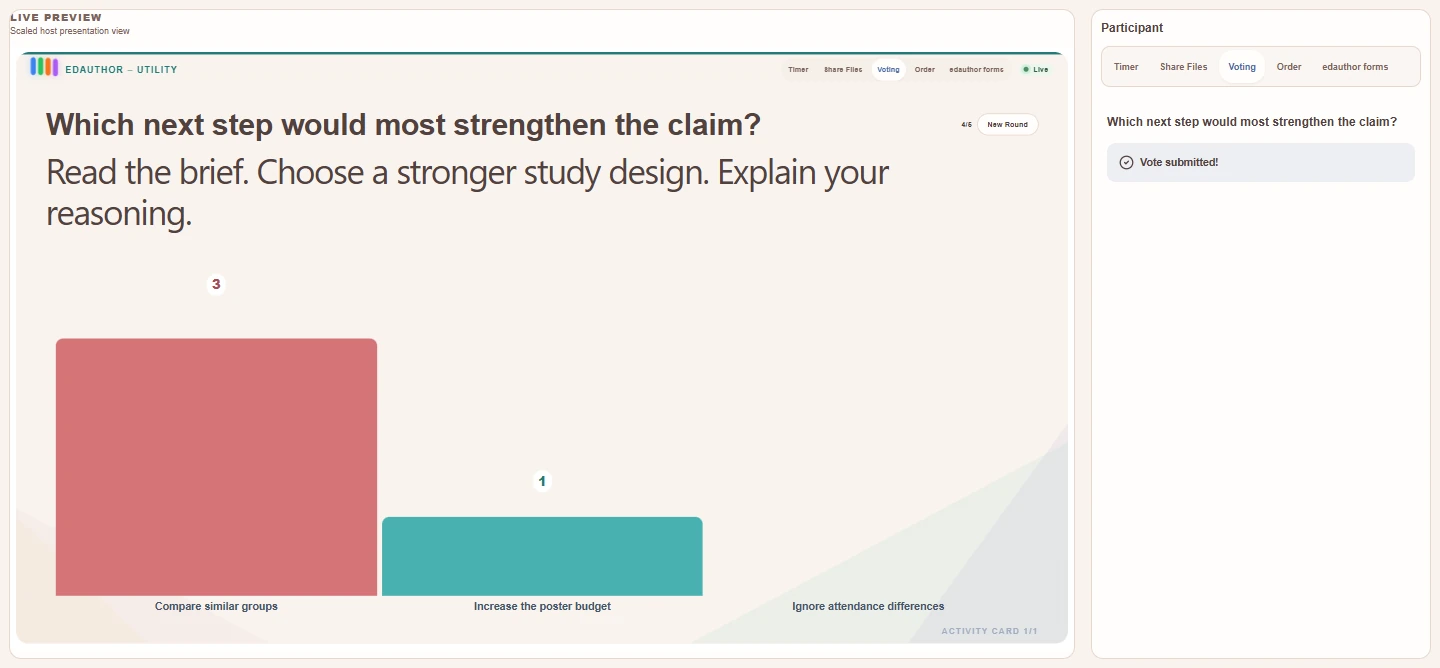
In Voting, choose Vote for listed options. Enter the question Which next step would most strengthen the claim? Add these options, one per line:
- Compare similar groups
- Increase the poster budget
- Ignore attendance differences
Use at least two distinct, non-empty options; the editor supports up to ten. The example invites a discussion about evidence. No option is configured as a scored correct answer in this tool.
Other vote types let participants vote for someone in the session, someone in their own group, or a group. Set up groups in the live session before using a group-based vote. Review Anonymous voting before you run the activity, and explain the chosen setting to the class.
In the live presentation:
- Select the Voting tab and choose Open Voting.
- Ask participants to open their Voting tab and submit their choice. Each participant can vote once in that round.
- Follow the responses on the host display. Choose Close & Publish Results when you are ready to discuss them. The vote also closes automatically when all eligible participants have voted.
- Ask participants to explain the reasoning behind the distribution. A popular answer is not necessarily a well-supported answer.
- To repeat the discussion vote, choose New Round, then open voting again. Treat this as a fresh round rather than an edit to earlier votes.
Participants may remain on Share Files while you open the vote. Direct them to the Voting tab when you want their response. Likewise, moving the host away from Voting does not itself close an open round.
Organise a speaking order
Select Order in the editor. Choose Order by join time for a predictable sequence or Randomise to prepare a random order.
During the session, choose Show order. The host sees the numbered list and each participant sees their own position. Use this for short explanations, demonstrations, turn-taking or reporting back after the vote.
Choose Update order if you need to refresh the list, including after someone joins late. With Randomise selected, updating can change the order, so announce the change before continuing.
Order is a facilitation aid. It does not score participants or automatically give them the microphone. Explain how long each contribution should be and use the Timer if helpful.
Create and collect a reflection form
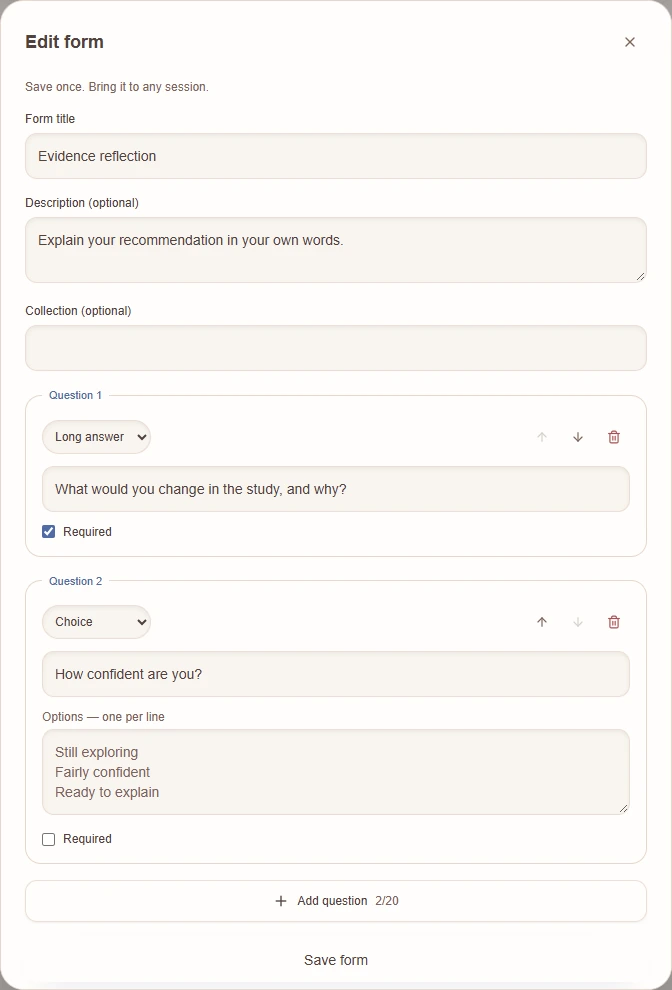
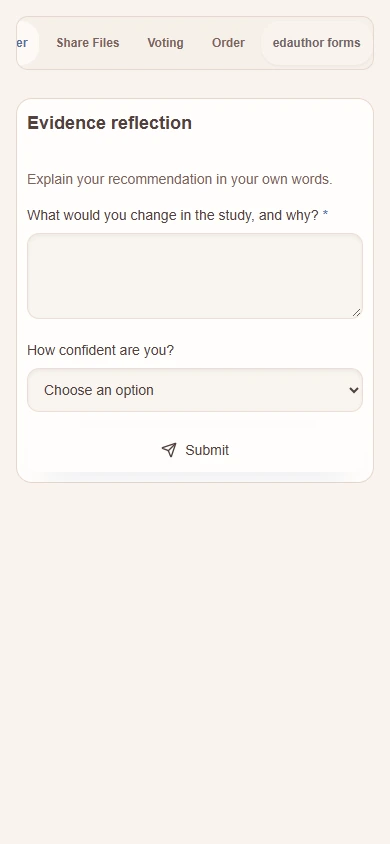
Open edauthor forms, then New form. For the example, use Evidence reflection as the form title and Explain your recommendation in your own words as the description.
Add two questions:
- Long answer: What would you change in the study, and why? Mark this Required.
- Choice: How confident are you? Use Still exploring, Fairly confident and Ready to explain. Leave it optional.
Choose Save form. You can return with Edit form. The prepared form is saved as part of the Utility card.
Forms support Short answer, Long answer, Choice, Email and Number fields. Add, remove or reorder questions, and mark only the necessary questions as required. A form can contain up to 20 questions; a Choice question needs 2–20 distinct options. A Number field validates a numeric response, not whether it is the correct solution.
During the live session, select the forms tab and choose Open Form. Participants complete it and select Submit. They receive confirmation and can use Edit my information to amend their submission while the form remains open. Close Form stops further submissions.
The host can follow the submitted count and review responses. Use View form responses for the fuller session review, or Export CSV when available on the account. Closing the form does not mean deleting the responses.
For this workshop, ask only for the explanation and confidence response. Names and email addresses are not needed as extra form questions. Access to forms and response exports depends on the account's enabled features.
Understand the participant experience
Participants join the live session in the usual way. When the Utility card is active, the included tools appear as tabs on their device. If only one tool is included, it opens directly.
They can move between the tabs independently of the host. On a narrow phone, swipe along the tab strip if some tools are out of view. The host does not have to display the file for a participant to read it.
An unopened vote or form shows a waiting message. This is expected: the host must open it first. Switching tabs preserves an in-progress form during that visit, so a participant can consult the brief and return to their explanation. They still need to press Submit to send it.
Say this before the activity: “You can revisit the brief whenever you need it. I will tell you when voting and the reflection form are open.” It prevents people waiting unnecessarily for the host's screen to match their phone.
Style, preview and rehearse
Use the card's Styles controls to choose a readable appearance. Keep the common prompt short, make the brief legible on a phone, and avoid relying on colour alone to explain an option.
Check Host and Participant previews and the available screen sizes in the card editor. Preview is useful for layout and wording; it does not replace a live check of votes, timer sounds, downloads or form submissions.
Run a short test session with a second browser or phone:
- Confirm that only the selected tools appear and the intended tool opens first.
- Start and pause the timer. Switch tabs and check that its state is retained.
- Read the shared file and open/download it on the participant device.
- Open voting, submit a vote and publish the result.
- Show an order and check the participant's position.
- Open the form, submit an explanation, review it as the host and close the form.
Use fictional responses during rehearsal. If an upload, vote or submission reports an error, resolve it before class and confirm that the action actually succeeded.
Run the complete workshop
Introduce the claim. Show the common prompt and ask participants to open Share Files. Give them a moment to find the brief before starting the three-minute timer.
Make a choice. Open the prepared vote. Invite one vote each, then close and publish the results. Ask what evidence would justify the most popular choice.
Hear explanations. Show the speaking order and invite short contributions. Distinguish a difference in observed marks from a demonstrated effect of the workshop.
Reflect. Open the form and ask for one proposed change with a reason. Close it after checking the submitted count, then use the responses to plan the next discussion.
Save the card set to reuse the preparation in another session. The file, questions and settings are the reusable lesson materials; the live countdown, voting round and form collection are actions you run with each class.
Adapt the card to your teaching
Seminar reading: share a short extract, allow quiet reading, vote on an interpretation and use the speaking order to hear contrasting arguments.
Design critique: share a design brief, time a review, vote on a priority for revision and collect a written justification. Use the vote to begin the critique, rather than treating popularity as assessment.
Laboratory preparation: share a procedure, give time to identify uncertainties, and collect questions in a form before the demonstration. A submitted form is not proof that a practical skill has been mastered.
Keep the number of tabs proportionate to the task. Two well-chosen tools often work better than enabling everything.
When something is missing or not working
A tool is missing. Check Tools on this card in the editor and save the card. On a phone, scroll the tab strip. Older Utility cards may contain a Playground tab; create new playground activities with the dedicated Playground card.
Participants see a different tab from the host. This is intentional. Ask them to select the tool you are using; their tab choice is independent.
Voting or forms say the host will start the tool. Make sure this is the active Utility card, then use Open Voting or Open Form in its live controls. Selecting the editor tab only prepares it.
The timer is silent. Check the participant sound setting, device volume and browser audio permission after a user tap. Test on the devices you will use. The countdown remains visible even when sound is unavailable.
A file will not upload or preview. Check the 3 MB limit and export PowerPoint to PDF. Try Retry preview or Open / Download. If access is restricted, review the file-sharing feature prompt.
A form will not save or submit. Give every question a label, provide distinct Choice options, and complete required answers. Check Email and Number values. The host must keep the form open while responses are being submitted.
A late participant has no position. Use Update order and tell the group if the sequence changes.
You need a score or a learning route. Use the appropriate scored Activity Card, or explore Space Card Learning quests and Playground quests. Utility is the place for the supporting session tools.